RSS

Another New Chandelier, this time the Dining Room gets an IKEA PS Maskros

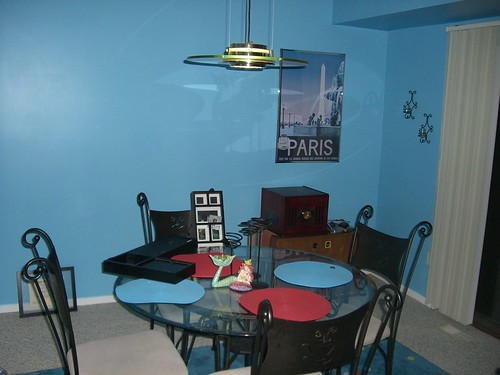
We’ve apparently have been on a lighting kick as it’s two posts in a row about switching out chandeliers.  Last time it was the living room that got a switch and this time it’s the dining room.  When we bought the house I The old circle table and UFO lightthink the only ceiling fixture we agreed on liking was the UFO themed light in the dining room.  it was mod, clean, and matched the cheap hand me down circle glass table we were using at the time for our dining.  In fact, these two combined turned the dining rooms unofficial name into the circle room, and we adorned it with circle placemats, a circle rug, circle photo frames, etc.
After a few years with the existing light 2 problems became pretty apparent.  (1) it was pretty dim.  A single halogen bulb diffracted through a cylinder of glass is not a formula for bright lighting.   The room didn’t work well for games at night because it was too dim to read cards/rules/etc.  (2) it generated a lot of heat.  Those halogen bulbs are hot, and even though it was small, it hung low to the table, and thus you got the heat from it right up in your face.

As a bonus problem that came of our own designs, we switched the dining room table out with a triangle shaped one.  The table has a built in circle Lazy Susan , so it still works in the circle room, but it happens to be exactly the same size as the light, but based on some unfortunate geometry of the room, we could never align The old UFO light off center from the new tablethe two.  It may seem silly, but this got really aesthetically unpleasing to me.  So 3 strikes and your out I guess?

We were taking a nice afternoon stroll over at IKEA and they had on display their new PS Maskros Product, a giant more than two an a half foot diameter sphere of petals with a lighted core.  When you see it, you cant’ stop and look at it, then you get close to it and realize it’s made out of paper, wire, and that’s about it.  it’s very surprisingly affordable at < $100.

Installation was pretty easy, the big problem I ran into (that I always run into when replacing lights in this house) is that the plate’s screw holes didn’t line up with the ceiling box’s screw holes.  Apparently ceilign boxes changed their diameter at some point between when our house was built and the last couple of years as none of the newer lights fixture match up right.  Not a big deal though, just a titanium drill bit away from a making it all fit correctly. Also, since I have the standard 8 foot ceilings I had to fix the length of the wire so that the globe was very close to the ceiling.  On this model that can be a little tricky because you actually have to make the wire longer when securing the plastic base cover to the ceiling as it slides up and is held in place by locking it down to the wire.  It came out fine in the end though, so no biggie. 

The IKEA PS Maskros chandelierOne other note, I saw a lot of people complaining about this light because the plastic base cover’s diameter was smaller than the metal plate’s diameter.  This seems to be a problem with the smaller version of this light which is simply known as the Maskros (san PS).  If you get the bigger one, there should be no problems with the plate or covers side (unless you have a smaller ceiling box like me).

As far as the bulb, you can use any standard one.  I went with a 100 Watt equivalent dimmable fluorescent to eliminate the main problems of (1) not enough light & (2) light ran too hot.  I had never used a dimmable fluorescent before, and I’m not totally sold on them as they do not seem to gracefully change brightness as I would like as much as I would like, it’s more like they turn off and then back on at different settings.  But I can’t argue with the brightness quality, things are very easy to see in that room now, nor can I complain about the heat when sitting under the light.  so I will claim problems solved.

Because it’s paper, a lot of people have gotten creative and started to color it with markers and highlighters.  Once example is over @ http://www.ikeahackers.net/2011/06/mod-verner-pantonesque-lamp.html that I found to be a really nice color fade.  However the boss disagreed and hence we haven’t taken the extra step to color it in, but I still think it came out A-OK.  Here’s a picture of it lighting up the room, notice the cool shadows it creates:

The IKEA PS Maskros chandelier lit up

 
3 Comments

Posted by on January 13, 2012 in Dining Room, Ikea, Lights, Things bought, Things done


New Chandelier in Front of the Fireplace

We’ve recently had a new addition to the family and it was decided that mom deserved a push present for her hard 9 months of work. A while back we were looking at fancy modern lighting on ebay of all places and saw The Old Can Lightsome really cool pieces that we drooled over a bit.

We Discussed where we thought we needed to change the lighting and determined that we were both pretty unhappy with the recessed Can light that shined down on the fireplace in the living room.  It was pretty dim, the opposite of ornate, and since it was an angled can really didn’t server any function.  You can see it in this first picture at the top, it kind of looks like a zit on the ceiling.

The first chandelier that caught our eye was this beauty, a De Majo Processco K19.  This thing is clearly ornate & eye catching, and we would have bought it right away…accept the auction was starting at $900, which sounds like a lot until you learn that retail on this thing is north of $2500.  I’m all for the nicer things, but didn’t think this really fit the bill.The $2500 De Majo Processco K19

From there we started looking at more affordable options and over & over many of the auction were being presented by a company named Great Shoppers (http://greatshoppers.net/) which appears to be a company in hong kong that cut out the middle man distributor and ships their products direct.  We agreed that if we were to get something then this bad boy would be the one that we’d want, so when it came time to shop for a push Silver Aluminum Wire Ceiling Lightingpresent the under $200 price was exactly the right spot.

I was a bit hesitant as there’s not a lot of info about great shoppers on the net, and they don’t have the most advanced fulfillment system, there’s no tracking on your packages, and it takes a LONG time for the stuff to get here.  I think shipping was over $70 as well, adding to the price, but it was a big (4’x4’x1’) box being shipped from the opposite end of the world.

Once it came, we were a bit busy with the new baby, but eventually I got around to installing it.  The first step was to take out the old can light.  When I unscrewed the bulb there were two pins on each side that allowed the lower part of the assembly/crown to detach.  It had two wires running to it which I cut to detach it.  That left the outer assembly which was attached to the mounting bracket which in turn was attached to the dry wall and studs.  I thought about keeping this there and just mounting the new light over it reusing the wires, but they weren’t long enough to make assembly easy and they were of a pretty thin gauge as well.  The new light was rated at 270 Watts vs the older bulb at something like 70 watts (less since it was fluorescent).

There were 3 screws holding the top can to the mounting bracket so I took those out and the can dropped down. and revealed a small junction box where the crappy wire was twisted into the standard romex.  The existing wires were shielded by a metal tube so I detached the tube and ran my own romex through it, hooked it up at the junction box and ran the tube right out the hole.

The hole was a bit of a problem as it because a huge source of cold, cold, cold air.  There has always been a draft in that corner of the living room and I always assumed it was from the fireplace but I think I discovered that The Original Can for the Old Lightit was this recessed light as there was virtually no insulation around it (probably because of heat).  Since the light was no longer recessed I put stuffed some insulation up there through the hole but the next time I climb around in the attic I’ll need to do a much better job of insulating that specific area.

The hole posed another problem.  The new fixture mounted to the ceiling with 4 screws, 1 each per sides of a cross or + bracket.  The fixture than mounted to that bracket via some screws that were fixed to the bracket (so they’d line up with the holes on the light’s base (the square part).  There was no way to mount the bracket through the dry wall appropriately using anchors as 1 hole would always line up on top of the existing can hole (you can’t mount to air) and another was right underneath the afore mentioned junction box (which wouldn’t accept a drywall anchor as it was made of The New Light Before Adjusting Heightstin).  I had a eureka moment and fashioned by own + shaped bracket from two straight brackets and put that above the drywall in the ceiling, then bolted that to the lights bracket.  This created a squeeze bracket that I wish I had taken a picture of, but none the less it was very sturdy and secure.

After that I just wired up the transformers to the new romex and tightened all the screws up.  At first the globes were all hanging much too low as you can see in the picture, but you can actually adjust them after you mount the fixture to the bracket & ceiling by just pushing the wire up and in.  If you go to high, you can push up on the lip of the hole for the wire and pull the wire down, but this is a bit harder and tears the hell out of your nails.  We played with a lot of different configurations and a few fingers nails later go it exactly as we wanted. 

The last step was to remove the protective plastic, this was actually harder than it should have been. Since I had such a snug fit to the ceiling and the protective covering went up and over the sides I actually had to un-mount it to remove the plastic where it would be squeezed (it would drive me crazy if a little bit of frayed cover was left) and I had to go a step further as every location a wire comes down has a mouth lip that actually is covering the protective plastic as well, so you have to loosen each of those by unscrewing a nut on the back and pull the plastic away from them otherwise you’d have frayed edges around them.  I would suggest doing this first before you wire it up as it makes things a lot easier, kinda like prep work.  It was all worth it though as you can see, I think it turned out great!

DSCF1339.JPG

The globes cast a really interesting pattern on the ceiling.  The base is a lot more reflective than the picture on the website which makes it look more like a brushed nickel than the mirrored steel look it actually has.  This mirror’d surface means it’s a bit easier to notice scratches so be very careful when handling it if you get one.  here’s another look at it where you can see the shape of the globes (they’re kinda hard to see with camera flash as they are a bit reflective):

DSCF1341.JPG

It’s been a few weeks and most the wires have straightened out from gravitational forces.  The globes themselves are not shipped as perfect spheres, but you can kind of man handle them and mold them to the right shape.  they don’t have to be perfect, but you can kinda see the flat edge on the front middle one, since the time the picture was taken I’ve rounded it out.

As far as Great Shoppers, I was hesitant to buy more than 1 thing even though they have a lot of cool stuff because you never really know what you’re getting.  This thing isn’t made of the best materials, and if it was mishandled it would probably not stand up to the abuse, but since it’s a chandelier that will likely never be touched it’s pretty safe.  I would probably buy from them again in the future to do other lights in the house, as long as they are away from contact.  Also it sucks that the little bulbs aren’t LED’s or Fluorescents, maybe I can find compatible bulbs although that might mean I’d need to change the transformers which would be a project for itself.  For the prices they offer things at, I think it’s worth the gamble as I feel like the pictures were pretty accurate to the product I received.

Finally, the new fixture sits right over a newer swivel chair that I’ve been using instead of a lazy boy and it works great as a reading light.  The living room is MUCH brighter (9 lights at 30 watts each will do that) now, so we’re pretty damn happy with the purchase.


Fixing the SUPERDRAWER

After spending about a year using the SUPERDRAWER we’ve found it to be awesome.  But every so often the left cabinet wall gets a little loose and the space for the drawer becomes too wide and the CIMG1119.JPGdrawer gets hard to move because it’s not on the rollers or it will just fall out altogether.  After adjusting the wall a few times I finally decided to fix it.

I went with a simple L bracket that mounted it to the bottom of the counter.  I also put a few screws from the side into the divider between the drawer and the cabinet space below.  This won’t do a lot to support the wall, but I figured it wouldn’t hurt.

Overall, as you can see in the picture, this doesn’t look too visually appealing, however  I don’t really care too much.  Hopefully one day we can update all the kitchen cabinets.

While I was tweaking the drawer, I decided to fix another nagging problem.  When I created the merged SUPERDRAWER I apparently didn’t make it to a perfect size as it hung a little off the edge of the rails.  To remedy this I decided to put a few washers between the rail and drawer on one side.  At first I put two washers behind every screw and tried that out, but it got really tight when it got near closing.

CIMG1121.JPGA quick measurement showed that my drawer was a little narrower at the back then at the front.  Reducing the washer count for the screw at the front down to 1 evened it out just right and now the SUPERDRAWER works better than ever.  You can see the washers in the picture.

 
Leave a comment

Posted by on February 16, 2011 in Kitchen, Things done, Things to do


Rerouting some wiring in the living room

As part of a much larger project we needed to move an electric box over a few feet in a wall in the living room.  The new location was on the opposite side of a supporting beam, so it wasn’t the easiest task.  CIMG1028We ended up drilling into the beams from the side (less than 1/3rd the width of the support, so within code) and just laying the wire across the wall as shown in the picture.

The big downside to this, is that if you ever tried to screw or nail into the part of the wall that has these wires, you’d probably get quite a shock.  So I now have a golden rule to never screw or drill or whatever into the wall between the 58” & 66” inch marks.

 
Leave a comment

Posted by on January 26, 2011 in Family Room, Things done, Wiring


NBA Style Basketball Hoop

Late last winter, I was windows shopping at Dicks Sporting Goods in the basketball hoops section and there was a sign on one of them that said something like “ask us about last years models at a The new goalrilla GS-I from our bedroomdiscounted price”, so I did.  turns out Goalrilla refreshes their displays ever year or two and Dicks sells the previous display models at a huge 70% discount.  I asked if they had any left, and sadly they did not, but there’s lots of Dicks locations in the area so I started calling around, and a few of them had hoops left.

There was 3 systems for sale, the GS-1, GS-2, & GS-3 (the goaliaths were on sale too, but I’m not a big fan of them as I’ve seen them fall apart pretty easily) which are normally priced at $1800, $1500, $1200 each.  The discounted prices were $700, $600, $500 so the only question was which one I wanted to go with.

The new goalrilla GS-I from belowAfter some debate, I decided on the big one, the GS-1, as it was the sturdiest and it would fit ok on the driveway.  I had to wait 2 months after purchasing to get it installed because the ground was frozen, but once they got it up I was in love.  It makes an awesome sound when you bounce the ball of the backboard, it’s so sturdy, and there are no noticeable problems with it from being on display for a year.

Two things I’ve noticed since it went up:

First, I have a really unfortunate crack down the middle of the hoop side of the driveway that needs to get fixed, I’ve already rolled my ankle twice.

Second, I need to extend the driveway in some way to get more surface area, it’s just a little too narrow with the 4’ overhang of the GS-1.  I’m thinking maybe something like a circular driveway or maybe just an extension to a third lane which would also be useful for parking needs.


Opening Up the Kitchen by Removing Cabinets

Even before we bought the house we agreed that the kitchen was a little outdated.  The sink was weird How the closed off kitchen looked before(we fixed that, even though it’s still pretty small), the tile has really weird old pictures on it, the stove is small, the microwave is really old, the stovetop is the old style coil, the fridge is pretty small and not one of those fancy tri-doors, and lastly it feels really closed off from the breakfast nook (although not the living room thanks to the picture window over the sink).

Slowly but surely we will fix all the problems (probably do a complete kitchen remodel one day), but for now we’re just trying to tackle them one by one.  This post is about that last issue of the kitchen feeling closed off.

How the opened up kitchen looks nowOnce we switched the trash compactor for more shelving we had enough shelf space in order to remove some of the cabinets in the middle of the kitchen, and that is exactly what we did.  As you can see in the pictures it really opens up the breakfast nook & kitchen and makes them almost appear as one giant room.  We had to patch in the soffit as it was just an open hole above the cabinets, but that wasn’t too hard.  We also used some contact paper to cover up the rough side of the remaining exposed cabinet.  Overall it looks pretty snazzy I think.

We’ve been toying with the idea to turn the counter into some sort of two tier system with a breakfast bar & some stools, probably using something like this capita mount from ikea.  This wouldn’t be a long term How the kitchen and nook are more together nowfix to all the kitchens problems, but it’d be a cheaper quick solution for sure.


New Lights in in the Bathroom

Ever since leslie’s secret project in the downstairs bathroom which turned out to be new paint we’ve been without a light in there.  It hasn’t really been too bad because of the giant window in that room keeps it pretty light in there during the day, New bathroom lights onand you can still see pretty good even at night,but clearly this wasn’t our long term plan.  for a while I even was using the old kitchen light in that room.

Why it took nearly 2 years two years to replace the light is because we are extremely picky.  For a long time we were looking for some type of chandelier to put in the bathroom.  We thought it would be a cool concept to have a chandelier in the bathroom, but we just couldn’t find one that was tight enough to the ceiling to fit the space that we had.

I think we went through about 4 product refreshes at the local lowes & home depot before we finally came across one that we both really liked.  We never really went searching the web for lights, and maybe that was a mistake, but it’s all over now.

Installation was really easy.  The main part hangs off the box, and the two arms require one screw each.  I ended up using some drywall anchors for those, and they’ll be a bit of the pain to get out because they are the cobra drillertoggle zinc type, which are really awesome and my personal favourite.  BTW, avoid New bathroom lights offthe non-zinc ones as I’ve found these ones to be total pieces of shit that will crack their plastic base if you hit any type of resistance.

 
Leave a comment

Posted by on December 30, 2010 in Downstairs Bathroom, Lights, Things done


A leaky Roof Investigation & Resolution

A little while ago we had a mega storm in michigan, I think I heard we got like 5 inches in less than an hour, it was very intense.  We were watching TV during the storm and all of a sudden I noticed these very strange lines on our new tv.  They were long streaky vertical lines that distorted the image a bit, and it was very curious.

I got up to check out the lines and as soon as I got close it was pretty apparent it was water running down my TV.  This was a bit upsetting, and when I looked for the source of the water I saw a new crack in our ceiling.  Watching the crack, every 15 seconds or so a large drip would fall from the crack and run down the wall unit to the tv, then to the floor.

The ceiling crackThis was not good at all.  This was actually the second time I’ve found a leak in the house.  I never posted about the first time as it turned out to be a simple mistake of how the flashing was installed and was remedied very easily, but this one was so much more complex.

I went up into the attic of the living room (there’s actually two attics in this house, one for the garage/pool room/living room & another for the upstairs) and moseyed over to were the crack was.  I could hear the drip but I couldn’t see anything that was wet.  The crack was generally under an exhaust vent, so I thought maybe with the strong rain it had just been run over (it happens some times) but I never saw any water in drip from there when I heard the noise.  After watching for about 10 minutes the rain stopped and so did the dripping, so I decided to give up for now.

A few nights later it started raining pretty hard again, and I noticed a dripping noise in the third bedroom upstairs.  It was pretty loud & it seemed to be coming from the closet near the outside wall.  This is actually very close to where the crack was, but it didn’t make much sense because the upstairs is a bit higher than the ceiling in the living room.  The rain stopped pretty quickly, and there wasn’t any water coming through the crack so I figured it might have been a drip on The crack in the ceiling above the wall unitthe outside hitting a window or something.

About two weeks after that it was raining and I was in the upstairs bathroom and I heard what sounded like a drip again.  This time I heard it coming from behind the bathroom sink.   the bathroom sink is on a diagonal to the corner, and backs to the third bedroom closet so it was a good assumption that this and the most recent drip were one in the same.  The drop soon stopped even though the rain didn’t, but it was a very light rain that night.  there was no water coming from the crack in the living room ceiling.

I was in the kitchen a few nights later when I heard another dripping noise.  this time it was coming from above the corner of the cabinets, next to where the crack was, below the upstairs bathroom sink & third bedroom closet.  So clearly this was all the same drip, but again no water was coming through the crack in the ceiling so I didn’t have any evidence they were the same drip, or if that drip was the problem.  That night I also recalled hearing the drip in the kitchen before when it was raining pretty heavily, so this drip had been a problem since we moved in.

A month or so passed and then the crack started leaking again.  I checked and sure enough I heard the same drips in the kitchen, upstairs bathroom, & third bedroom.  Armed with this evidence I went back into the attic.  I moseyed over to the noise, and this time I looked in the wall towards the bathroom.  I moved some insulation aside and surprising there was no drywall behind it.  It turns out there’s like an open cavity between the living room attic and the area behind the upstairs bathroom sink.

I stuck my flashlight in there and on the floor was a small pool of water.  And every 15 seconds or so I saw a drip splash into the puddle.  Looking up the drip was running of an exhaust pipe that ran up to the roof.  I couldn’t prove this was the source of the leak, but it sure seemed likely.  One extremely annoying thing was that there was a ton of foam insulation spread all over the place in that alcove, like someone had noticed the problem before, but instead fixing the root issue, they just blocked the secondary leak to the ceiling in the living room.

At this point I called a roof guy.  He went and checked it out and said that some of the plywood next to the exhaust pipe was definitely getting wet, and that the tar (or whatever) wasn’t sealing the pipe right.  He spent about an hour on the roof fixing it and told me to call him back if the drip noise came back.

It’s been winter ever since that so it hasn’t rained.  There’s been no leaks from the melting snow, but that doesn’t mean it’s fixed.  It’s supposed to rain on new years eve, so we’ll see if it leaks then (if I’m at home).  For now I consider the problem fixed, but I’ll be keeping an eye on it.

The last thing left to do is to sand down and patch the ceiling to eliminated the crack after I verify the leak has been plugged.

FYI: To get to where the crack was I had to cut the phone line that runs to the jack next to the fireplace & the one on the opposite wall to the pool room.  We don’t have a land line so this doesn’t affect us, but if someone wanted to put a phone in either of those locations than they’d have to reconnect this line (I might end up doing it for them, since it’s bad practice to ruin a perfectly good jack). 


New Over the Sink Light in Kitchen

Leslie was not very happy with the light we had over the sink in the kitchen, I think it was just because it New over the sink lightwasn’t our modern style and was very plain.  She found one that she really liked at lowes and asked me to install it.

There wasn’t much work to do.  The old light was hanging by two screws that were just screwed into the drywall, which wasn’t very secure.  I had to patch those holes as the new light hung from the box (as it should) and those holes weren’t necessary and exposed.

Sorry for the poor shot of the old light, I didn’t get a very good before picture, but I actually used it in the bathroom for a bit and have a good shot of it in one of the bathroom painted pictures.  As you can see, it was pretty ugly (and it was also pretty beat up).

I also missed posting about a few iterations of different paint colors that leslie tried in the kitchen, but you can see in this one the final choice of a purple color for the soffit (she also settled on this color for the main wall in the breakfast nook).  At one point it was striped, at another it was green, but I think the Kitchen from breakfast nook, can barely see the old over the sink lightpurple looks pretty good & I love the light

 
Leave a comment

Posted by on December 30, 2010 in Kitchen, Things bought, Things done


Leslie’s Secret Bathroom Project

I mentioned a long time ago that leslie had a special project going on in the bathroom but I never New paint in bathroom, also using the old kitchen lightNew paint in bathroomfollowed up on what it was she did!

Very simply, she painted it a new color.  I can’t find any “before” pictures, but I think it was white.  She chose a purple-blue color because she found bathroom rugs that she liked, and the paint color matched the bathroom rugs.  The pain has a real bubbly texture to it, so I’m a bit worried if we ever decide to repaint it that it’ll cause a bazillion headaches from all the sanding we’d have to do to get it event.  But none-the-less it looks pretty awesome.

 
2 Comments

Posted by on December 30, 2010 in Downstairs Bathroom, Painting, Things done


New Ellington Capri Fan in the Master Bedroom

We got some new bedroom furniture, and the bed is a canopy style.  It’s really cool, except it’s so tall (74”) and the ceilings so short (~78”) that there was practically nowhere that we could put it without making it hit the fan.  In fact, we had to take the fan down just to construct the bed! 

Ellington Capri fan in our bedroomAfter we decided where we wanted to put the bed (on the south wall, next to the window so we get awesome sunlight in the morning) we then figured out where we could put the fan.  So we installed a new fan box a few feet north of the original. Then we got to thinking that the ugly old fan (brown and brass) didn’t match our furniture (black) or style (modern) and started looking at other fans.

I wasn’t really a fan of any of the options at the normal places like lowe’s or home depot, and i remembered that when we were looking for the chandelier in the foyer a lot of the places we went to offered some more exotic fan options.  None of them were the one i wanted, but it made me go to the web in search of the perfect fan!

It took a few weeks of debate but i finally settled on the Ellington Capri.  I checked around and found by far the best deal at http://lightingbygregory.com so if you’re in the market for a fan, check them out!  There was a problem however, the fan was really tall and with our low height ceilings it was going to hang at about 5’5” off the ground which would be totally ridiculous.

We ended up having to cut the rod that runs from the base to the fan mechanism.  Then we drilled the guide holes into it.  It made it a lot harder to put together, but with some care it all fits together pretty nicely and I can walk underneath it.

It moves a good amount of air, as it’s actually pretty large.  It also lights up the room pretty well.  The % of brightness, fan speed, & direction are all controlled with a little remote control (which is easy to lose!).  The control uses infrared (IR) so you have to point it at the fan, so that’s a bit inconvenient, but it has a pretty wide IR angle.  We ended up moving the couch in our bedroom to the wall nearest to the fan so that we can lay & be extra cool in the summer.

the piss poor patch job on the old boxOne thing that bothers me about the fan is it only allows for on/off functionality at the wall switch level, which seems to be a common theme with the newer fans.  This means that there’s 0 potential for it to be enabled with z-wave at a future date.  We did leave the 3 wire run to the fan in place in case we ever want to switch the fan to something that requires that.

A final note, the patch job on the old electrical box is pretty much god awful so we’ll have to fix that up somehow in the future.  Maybe we shouldn’t have patched it, and instead just installed a blank in case we ever want to move the fan back to that location.

 
Leave a comment

Posted by on December 30, 2010 in Master Bedroom, Things done, Things to do, Wiring


Guest Bedroom Painted & Fan Installed

So a long time ago i mentioned that i bought a fan for the guest room and i even said that it would probably be a while before i got around to installing it.  Well a while turned out to be roughly two years!

Green Guest Bedroom with New FanThe installation of the fan itself wasn’t that hard, we just had to cut a hole in the ceiling and install a standard fan mounting kit that you can get at any hardware store.  It basically connects to the rafters in your ceiling and is pretty adjustable so that you can get it over the hole that you just made.  The only trick is to make sure you don’t try to put a hole right on top of a rafter.

I didn’t do the wiring, but that turned out to be the tricky part.  I wanted the switch to be just to the left of the door (on the right side coming in) but there was already a switch there.  That switch controlled one of the plug in the room, so it was most likely for a floor lamp.

What made it tricky was the wall from the bonus room backs right up to that location and the box was screwed into the studs for the bonus room and not to the side studs as you would normally see, so getting it out (we had to get it out so we could fish the wire through from the attic) was a total pain in the ass.  Ben ended up ripping a giant hole in the wall just to get it out.  Then we had to spend a lot of time finding a shallow enough box to fit in the space since we bent the original to hell.

In the end everything got put in & patched and it all looks pretty good.  Leslie decided to pain the room lime green, something she’s wanted to do/have her entire life.  so good thing she can die complete now.

We ran 3 wire romex to the fan so incase anyone wants to replace it with a fan that can have a wall speed control they won’t have to rerun the wire.  Also we took the plug off the switch, but the wires are in there if anyone wants to make it so the switch goes back to controlling the plug.

Finally, while we were at it we installed a coax jack in the room so you can get cable TV in the room.  We ran it from the garage attic through the garage, to the basement.  Quite a maze there…maybe we’ll make it prettier and get everything into the attic somehow and not have to go via the garage.

As for the fan, it works really well.  It lights up the room awesome and the airflow is really impressive.  I hate AC and it really cools down the room during the warm summer months.  If you’re looking at buying this fan and have any worried about it, don’t!!!!  You can get it at lowes: http://www.lowes.com/pd_156359-445-7850544_4294856737+4294965856_4294937087?productId=1036805&pl=1


Combining Drawers in the kitchen to make SUPERDRAWER

We got a bunch of new silverware and a new silverware bamboo drawer separator thing, but there was a serious problem…it didn’t fit in either of the drawers!  I always thought the two drawers that were side by

SUPERDRAWER

side were pretty pointless because of how small they were so i decided to take a peek at them and determine if combining them would be feasible.

They were pretty simple (sorry for no pictures, i didn’t have the camera till after the fact) drawers.  they had 4 1×2 sides, and quarter inch panel floor, and a drawer face.  I determined that all i needed to do was take out the inner pieces, get a larger quarter  panel that spanned both drawers and get a 1 x 2 x ? piece to fill in the gap in the front sides that would hold the drawer fronts together.

After a little sawing and screwing everything turned out pretty great and now there’s a large drawer in the kitchen that is pretty functional.  I call it SUPERDRAWER!

 
1 Comment

Posted by on March 22, 2010 in Kitchen, Things done


new Quoizel Salamander Chandelier in the Foyer

We were never too happy with the existing chandelier in the foyer, it was pretty bleh.  We spent a LOT of The old bleh chandeliertime trying to locate one that (A) we liked & (B) fit right in the foyer.  A was unsurprisingly difficult as leslie & i have very different tastes, but B turned out to be surprisingly difficult as the actual space made available for a chandelier in our foyer is limited by the bonus room for the master bedroom (it’s the big blank wall/ceiling in the pictures.

After a long search we finally ended up in howel and came across the “salamander” light fixtures by quoizel lighting.  These had really cool colors that we both were immediately attracted too and their were a few options available that had enough bulbs to light the foyer but were slender enough to fit our foyer.

In the end we spend about $350 on it with various discounts, i think we got a pretty good deal!  Oh, i almost forgot, i put the old one on craigslist just listed as if you want it you can have it and i had a ton of The new Quoizel Salamander Chandelier with lights offoffers for it right away, so i guess it wasn’t that “bleh” after all, eh?

The new Quoizel Salamander Chandelier with lights on

 
Leave a comment

Posted by on March 22, 2010 in Foyer, Things bought, Things done


Removing the Trash Compactor & Installing Shelving

So my most recent post (from forever ago) mentioned that i was thinking about removing the trash compactor and replacing it with some open shelving.  the new shelves where the compactor used to beWell i did just that not long after i wrote that post and am just now getting around to posting about it.

Taking it out wasn’t so hard, but it was pretty heavy.  I did find out that the kitchen floor linoleum is on top of an older style linoleum, at least underneath the cabinets it is.

The shelves aren’t that fancy, kind of a hack job, but they do function really well.  Also i made it so they fully extend by buying some standard hardware up and home depot.

Our current trash removal company is richfield, and they haul away heavy objects at no extra cost, so all i had to do was wheel the compactor out to the curb!

Also interesting to note is going through the original pictures of the kitchen i noticed that the dishwasher was different when we first went through the house.  Now it isblack, but it used to be white and matched the compactor.  I wonder why they switched it right before we moved in?Kitchen counter, dish washer and compactor

 
1 Comment

Posted by on March 22, 2010 in Kitchen, Things done


Kitchen Cabinet Shelf Supports

Over the months the shitty plastic supports that are god old have been cracking under the weight of our plates.  Turns out that there’s about 10 different sizes available for these things.  After a few tries, it turns out that mine are actually the 5mm size.

That said, the cabinets in the kitchen are really lame, nothing about them makes sense and they really close you in.  I need a much better layout in there, maybe move some cabinets to the much oversized breakfast nook.

Also, i’ve decided that i want to remove the trash compactor (i’ve never used it) and replace it with some open shelving.


Rescreening the Doorwalls

The screens on the doorwalls were getting pretty ratty and torn, so i decided to redo them.  I went with the pet protector ones because they don’t break and tear as easily.  They cost a little bit more, but totally worth it.  The only thing that set me back is i originally bought the .175” spline, but it was way too thick.  Turns out that the .125 (the smallest they had) was the right size.  It went in very easy once i bought the nicer screen tool.

I did mess up a little on the bottom of the dining room door, it’s not all the way underneath the spline, but gravity is taking care of most of it.

Also, the dining room screen door is screwed up somehow, like the screws aren’t tight, and the frame comes apart when the screen is not in place.  I’m not really sure, and it wasn’t immediately apparent to me what the mechanics of the door really were, but there was a definite difference between the family room door and the dining room door.  Because of this, the dining room door got a little bent when i put it back in, and now i might need to mess with it again.


Outlet Wall

I could really use this in my house: http://www.facebook.com/ext/share.php?sid=112969225476&h=5Dhcr&u=w4Z-Q&ref=nf

Especially in the family room where i have a bazillion plug in gadgets, and two extension cords just isn’t cutting it anymore.

 
Leave a comment

Posted by on June 18, 2009 in Crazy Ideas, Family Room, Things to do


Water Pressure Reducing Valve

Water Pressure Reducing Valve & Pressure GaugeWhen my theories of my water pressure being too high turned out to be true, it became apparent that i needed to get a Pressure Reducing Valve (PRV) installed on my water main as  fast as possible.

My roommate said that his dad had installed one of these before, so i had him come over and had them do it together.

The (PRV) screws on so they actually had to sweat on some adapters to get it all in place.  They had the good idea of putting a water pressure gauge in after the PRV so you could easily know what the current pressure was as affected by the PRV.

The PRV works by just adjusting the screw that sits on the outside.  This specific PRV had a range of 80 to 40 PSI.  We played with some different pressures, and found that anything less than 60 PSI caused a Water Pressure Reducing Valve & Water Pressure Gaugewater hammer affect.  We determined that the step down from 95 PSI to less than 60 PSI was just too much for one valve.  We determined that if we wanted we could put two PRV’s inline with each other and step the pressure down one at a time, but i actually wanted a higher pressure, like around 65 PSI.

The good news, was that at 65 PSI the leaking tub actually stopped, without me even changing the plunger!  I’m still going to change it out, cause i know it’s damaged, but i couldn’t be happier with the way this little project turned out.  The PRV and gauge came to a total of $108.

One other thing that i might want to do, would be to put another gauge before the PRV, so that you could visually see the difference between the pressure change.  That would be pretty sweet!


Water Pressure is 95 PSI

Water Pressure GaugeSo i mentioned that i was worried about my water pressure being too high.  I purchased a water pressure gauge on eBay.  It works by just screwing onto an outside spigot, just like you would attach a hose. I hooked it up to the outside spigot.  It read 95psi!!!! way over the “safe” maximum value of 80 psi.  It looks like i absolutely will need to get a pressure reducing valve for my home.

Also, in addition to my original problems of the master bath shower, it is now the upstairs bathroom tub that is leaking.  I’ve replaced the plunger in it twice, and both times it has ripped after only a few days.  Obviously the rubber isn’t rated to 95 psi.

Anyway, the drip-drip-drip is driving me crazy.

 
1 Comment

Posted by on March 9, 2009 in Things to do, Upstairs Bathroom, Utilities, Water